Best FragPunk Weapon Tier List: Season 1 Meta
By Karl Reyes | March 10th, 2025 | Categories: Others
Many weapons in FragPunk perform drastically differently in combat, with factors like recoil pattern, damage-per-bullet, and fire rate that decide if the weapon is considered meta. In a competitive game like FragPunk, having a powerful and reliable weapon is key to winning matches. This tier list shows the current best and worst guns for Season 1.
Table of Contents
S-Tier
Discipline
Patterned after Counter-Strike’s M4A1, this assault rifle is the perfect weapon for beginners. It’s extremely easy to use and can reach a respectable TTK just from hitting body shots.
- Has low recoil and a good rate of fire
- Comes with a variable scope for both close-range and long-range
- Deals respectable damage per second
Fever
Like many AK-47s in most shooter games, the Fever demands recoil compensation from the user, but rewards with a fast TTK and easy clean-up kills.
- Slow rate of fire with a strong recoil kick
- Has high damage-per-shot
- Excels at any range.
Resolver
Like the iconic AWP, the Resolver is a bolt-action sniper rifle capable of one-hit kills. Though it’s expensive to buy, this weapon is absolutely lethal in the hands of a top fragger. Do note that the weapon deals less damage at further ranges, incentivizing you to fight at the right range.
- The slowest rate of fire in the game
- Deals 150 damage to the body
- Has damage fall off at 17 meters and beyond
A-Tier
My Way
Despite being classified as an LMG, My Way feels very similar to the assault rifle weapons in FragPunk, with a good fire rate and damage-per-shot. However, it also has slower handling and strong kickback which makes this weapon a bit more difficult to use.
- High magazine capacity of 45 rounds
- Similar rate of fire to the Discipline
- Deals slightly less damage than other assault rifles
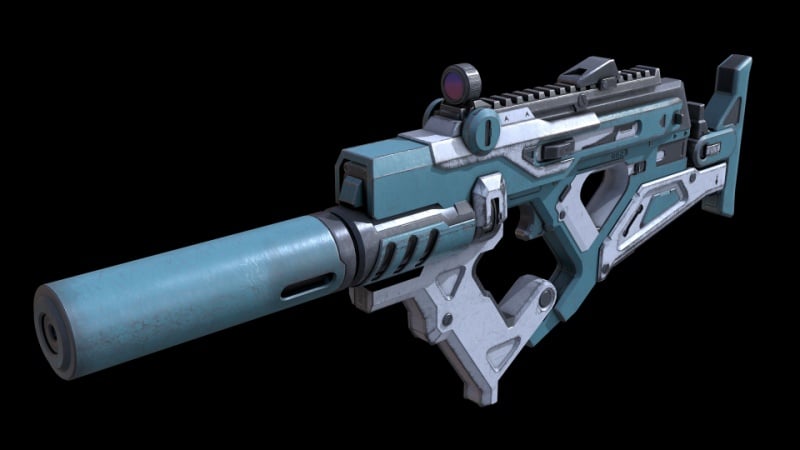
Mad Dog-S
The Mad Dog is a fairly balanced SMG, having manageable recoil, a fast rate of fire, and an integrated silencer that is great for flankers. It’s a cheap weapon and can do well in close to medium-range engagements.
- Low magazine capacity at 25 rounds
- Similar fire rate to the Discipline
- Suppressor allows for a stealthy map presence
Bad Moon-S
The Bad Moon is one of the two DMRs in the game, which is suited for medium to long-range firefights. This semi-automatic gun has a fairly fast fire rate and manageable kick that lets you stay accurate even at longer ranges. It’s a safe option for long-range maps, but the other assault rifles can do just as well in range.
- Fast fire rate for a semi-automatic gun
- Easy to control recoil
- Has good damage per shot.
Meat Maker
This pump-action shotgun is a CQC monster, dealing high damage and a consistent pellet spray pattern that is deadly up close. It can also potentially one-shot targets easily in close quarters, giving you a significant advantage in tight environments.
- Has 8 shells in the tube
- High damage per shot
- Perfect for peek-shotting enemies from a corner.
B-Tier
Clampdown
Modeled after the Kriss Vector, the Clampdown has the fastest fire rate among all the guns but is also quite difficult to use due to its low magazine count and recoil. At close range, it has a fast TTK, but don’t bother shooting at targets beyond 5 meters.
- Fastest fire rate in the game
- Has a wild recoil pattern
- Damage beyond 5m meters falls off dramatically
Ghost Pepper
This weapon is very unwieldy and difficult to use, as not only does its heavy weight slow your movement, but its spool-up mechanic makes it hard to react against peekers.
- Has the largest magazine size at 250 rounds
- Its fire rate starts slow, then ramps up the longer the trigger is held.
- Slows down your movement to a crawl
Boom Broom
A fully automatic shotgun that has a wider spray pattern than the Meat Maker. Compared to its sibling, the Boom Broom is far worse in performance, as it can only reliably kill enemies in point-blank range.
- Has 8 shells in the magazine
- Extremely wide spray pattern
- Deals less damage than the Meat Maker per shot.
Bad Reputation
Compared to the Bad Moon-S, the Bad Reputation DMR has more damage per shot, but has lesser ammo in the mag and has a stronger recoil kick. While it’s a good DMR on paper, the recoil makes it awkward to control.
- High damage per round, capable of 1-shotting to the head
- Only has 10 shots in the magazine
- Extremely difficult recoil when firing at full speed
Highlife
This sniper rifle is made for players with good movements, as it’s lighter than the Resolver, but deals less damage to the body, requiring two shots to kill. The Highlife is much more skill-demanding than the Resolver, as it requires players with extreme accuracy and movement execution to make good use of it.
- Faster cycle rate than the Resolver
- Deals low body shot damage for its class
- Low weight allows for faster movement speed