Baldur’s Gate 3 Blood of Lathander Guide
By Andrea Tan | August 8th, 2023 | Categories: Baldur's Gate 3
As you scour the lands of Faerun for resources, hidden chests, and monsters to fight, you might want to consider getting the Legendary weapon called Blood of Lathander. It’s a mace you can obtain early on in the storyline. As with everything else in Baldur’s Gate 3, the process can be tedious and time-consuming if you don’t know where to look. In this guide, I’ll cover everything step-by-step and show you how to get the Legendary weapon.
Table of Contents
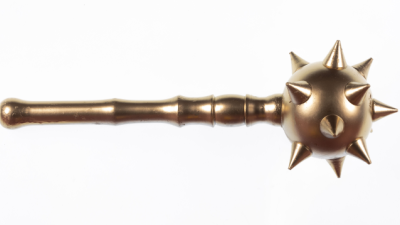
What’s the Blood of Lathander?
The Blood of Lathander is among the few legendary armaments in Baldur’s Gate 3. It’s a fantastic weapon for a Cleric (like Shadowheart), providing a powerful spell that can revive you once per long rest. It also heals any other party members in the vicinity.
How to Get the Blood of Lathander
The Blood of Lathander is at the heart of the Githyanki Creche, Y’llek—near the Mountain Pass. If you want to get the mace, you’ll have to find a way inside, which can be done by either befriending the Githyanki or being less hostile with them. Then, go to the Inquisitor’s Chamber, where a cutscene will start. Once the cutscene ends, you’ll be thrown into combat, but you can ignore the Inquisitor and skirt to the left, and jump into the west room with two statues inside.
The left statue will have a plaque saying, “Lathander bids the setting sun a fond farewell.” Meanwhile, the right statue says, “Lathander blesses the bountiful, rising sun.” The key is to turn them toward the sun rising and setting. But there’s just one problem: one of the statues is stuck.
Here’s what you’ll need to do:
- Hit the left statue with at least a ten damage attack to unstuck it.
- Turn the left statue to face west.
- Turn the right statue to face east.
Doing so will unlock a doorway that lets you go to a secret area that contains the legendary mace, though there are still some hurdles to jump through.
Getting Through the Barriers
You must break three barriers in this next section by destroying their active crystals. Plus, you’ll have to avoid or disarm any traps in between. Destroy the first crystal upon entry to the secret area to open the barrier. Then, avoid the Dawnbreaker trap that’s straight ahead by turning left and skirting around the edge of the cliff behind the next barrier. Finally, disarm the next Dawnbreaker, and look over to the northern edge of the cliff to see the crystal below. Shoot it using a ranged weapon to open the final barrier.
Time to Make A Choice
When you finish the barriers, you should be in the chamber with the Blood of Lathander. However, the entire monastery will blow up if you take the mace haphazardly. It won’t blow up immediately, but you’ll have to resolve the situation before the lance weapon on the roof destroys everything—including your party.
There are two options for you to take:
- Use the Dawnmaster’s Crest: If you’ve completed the Stained Glass puzzle on the Rosymorn Monastery above, you can insert the Dawnmaster’s Crest into the underside of where the mace is. Doing so will disarm the weapon. While the puzzle is elaborate, it has no amazing rewards, so it’s better to trade it with the mace.
- Destroy the Lathander Solar Machines: The devices can be found in each corner of the room. However, they can only be damaged with ranged attacks, and you’ll only have three party members to use during the fight (since one’s trapped with the mace). Make sure to destroy the machines within four turns.