Genshin Impact
Is Genshin Impact Coming to Nintendo Switch?
Since its release in 2020, Genshin Impact has remained one of the most played video games in the world alongside the tactical first-person shooter Valorant. At the time of […]
Feast of the Departed Warriors Guide
Feast of the Departed Warriors is an event for the combat-minded in Genshin Impact. It features three world bosses: the Electro Manifestation, the Aeonblight Drake, and the Coral Defenders. […]

A New Midsummer Event for Genshin Impact 3.8
We’re moving away from the Golden Apple Archipelago and into another temporary area for the summer. In Genshin Impact’s version 3.8, Travelers will be able to explore Bottleland, a […]

Best Healer in Genshin Impact
Back in 2022, I wrote this article. However, there have been new additions after almost a year, and it was too subjective. To revisit the topic, here’s a more […]

Genshin Impact Kaveh Builds and Backstory
Name: Kaveh Vision: Dendro Birthday: 9 July Constellation: Paradisaea Titles: Empyrean Reflection, Renowned Sumeru Architect Genshin Impact Kaveh Abilities Kaveh enlists the aid of Mehrak to assist him in […]

Genshin Impact Baizhu Builds and Backstory
Name: Baizhu Vision: Dendro Birthday: 25 April Constellation: Lagenaria Titles: Beyond Mortality, Owner of Bubu Pharmacy Genshin Baizhu Abilities Baizhu is the second Dendro healer and the first to […]

Genshin Impact Kirara Builds and Backstory
Name: Kirara Vision: Dendro Birthday: 22 January Constellation: Arcella Titles: Cat Upon the Eaves, Gold Level Courier of the Komaniya Express Genshin Kirara Abilities Kirara is a 4-star Dendro […]
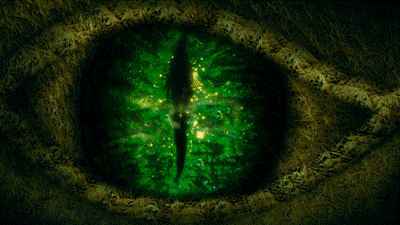
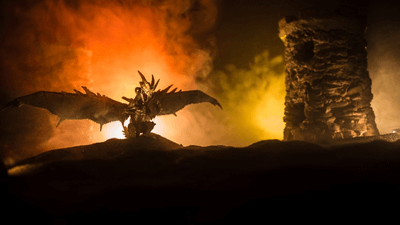
The Guardians of Apep Boss Guide
The Guardian of Apep is a new Trounce Domain boss battle in the likes of Stormterror, Childe, Azhdaha, La Signora, Raiden Shogun Puppet, and Shouki no Kami in Genshin […]
Genshin Impact Nilou Guide, Builds, and Backstory
Name: Nilou Vision: Hydro Birthday: 3 December Constellation: Lotos Somno Titles: Dance of Lotuslight, Star of Zubayr Theater Nilou is an interesting character because she has a specific party […]

Genshin Impact Brewing Developments Guide
This is technically a rerun of the old Tablet Analytics even. It has many similarities, but changes will undoubtedly occur as Hajanad’s research progresses. It is also a trial […]
Genshin Impact Food Event Character Preferences
Spices From the West is a recurring Genshin food event. In it, you make seasonings that turn ‘Delicious’ food variants into ‘Fragrant’ ones. The latter can be given to […]
Genshin Impact 3.6 Update Preview
With the Genshin Impact livestream released on March 31, the next events of the game have been announced. As per usual, there are new characters and weapons to collect. […]
Mika Guide and Backstory
Name: Mika Schmidt Vision: Cryo Birthday: 11 August Constellation: Palumbus Titles: Coordinates of Clear Frost, Front-Line Surveyor of the Knights of Favonius, Surveyor of the Reconnaissance Company Mika is […]
Who is Alice in Genshin Impact?
Alice is a mysterious character in Genshin Impact. Various voice lines mention her, mainly from Klee and Albedo (who are closer to her than others). Players heard her voice […]

Genshin Warrior’s Spirit Event Guide
Although it has a new name, this event is similar to version 2.6’s Clash of Lone Blades. You’ll fight one on one with a sword user without your elemental […]
Reviews, guides, and information on one of the best fantasy gacha-gaming experiences to have graced our systems.